
What Is Dye Penetrant Testing?
Dye penetrant testing is a widely used non-destructive inspection method that helps detect surface flaws in materials. It involves applying a special dye to the surface of an object, which then seeps into any cracks or defects. After allowing time for the dye to penetrate, the excess is removed, and a developer is applied to draw out the dye, making the flaws visible.
This technique is also known as liquid penetrant testing or dye penetrant inspection (DPI). In many industries, it's commonly referred to by several names, including liquid penetrant inspection (LPI), liquid dye penetrant testing, and simply penetrant testing (PT).
In this guide, we will use the terms "dye penetrant" and "liquid dye penetrant" interchangeably, as they are essentially the same method with slight variations in application and visibility.
Dye penetrant testing is one of the most popular non-destructive testing (NDT) techniques due to its simplicity, cost-effectiveness, and wide range of applications. Unlike destructive testing methods, it doesn’t alter or damage the material being tested, making it ideal for quality control and safety assessments.
[Dye penetrant NDT is just one of the many non-destructive testing (NDT) methods used by inspectors. To learn more about NDT, check out our comprehensive guide.]
What Is Dye Penetrant Testing?
Dye penetrant testing is primarily used to identify surface cracks and other discontinuities in various materials. The process works on the principle of capillary action, where the dye flows into tiny openings and is later revealed through a developer.
The test is often performed on non-porous materials such as metals, ceramics, and plastics. It’s particularly useful in industries like aerospace, automotive, and manufacturing, where detecting even minor surface flaws is crucial for safety and performance.
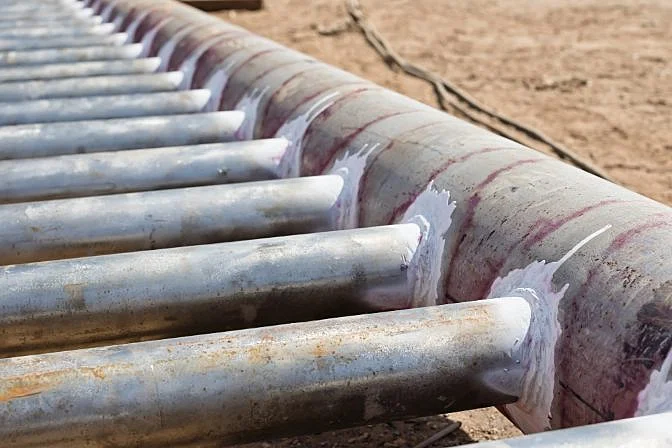
Common applications include inspecting welds, castings, forgings, plates, bars, and pipes. Inspectors look for issues such as leaks, joint flaws, fractures, porosity, and cracks caused by fatigue or processing.
The origins of dye penetrant testing can be traced back to the early 1900s in the railroad industry. Initially, it was done using the oil and whiting method, where oil was applied to the surface, and chalk was used to reveal cracks. Over time, dyes were added to make the defects more visible, leading to the modern dye penetrant testing method.
The Pros and Cons of Dye Penetrant Examination
Dye penetrant testing is a preferred choice among inspectors due to its low cost and ease of use. However, it has both advantages and limitations that should be considered before implementation.
Pros
- Easy to perform on complex shapes and surfaces
- Cost-effective with minimal equipment required
- Can cover large areas quickly
- Defects are visible on the surface and can show size and shape
- Works on a wide range of materials, including ferrous, non-ferrous, conductive, and non-conductive
Cons
- Only detects surface-breaking flaws
- Not suitable for porous materials
- Requires clean, unobstructed surfaces
- Needs direct access to the area being inspected
- Multiple steps involved, each affecting accuracy
- Requires cleaning before and after the test
- Uses chemicals that may be hazardous or flammable
Procedure for a Dye Penetrant Test
Performing a dye penetrant test typically involves six key steps:
1. Clean the Surface
The first step is to thoroughly clean the surface to remove dirt, oil, or other contaminants. This ensures that the dye can effectively penetrate any existing cracks or flaws.
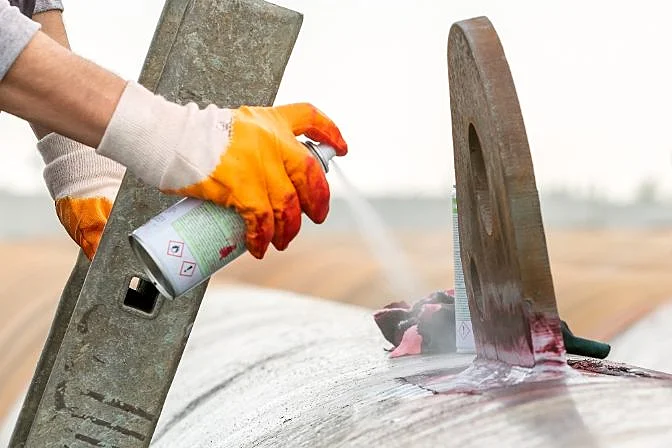
2. Apply the Dye Penetrant
A specially formulated dye is applied to the surface using a spray, brush, or wipe. The dye is left to dwell for a specific amount of time, usually between 5 to 20 minutes, depending on the product instructions.
3. Remove Excess Penetrant
After the dwell time, any excess dye is wiped off using a dry cloth. A remover is then applied to ensure all non-penetrated dye is removed from the surface.
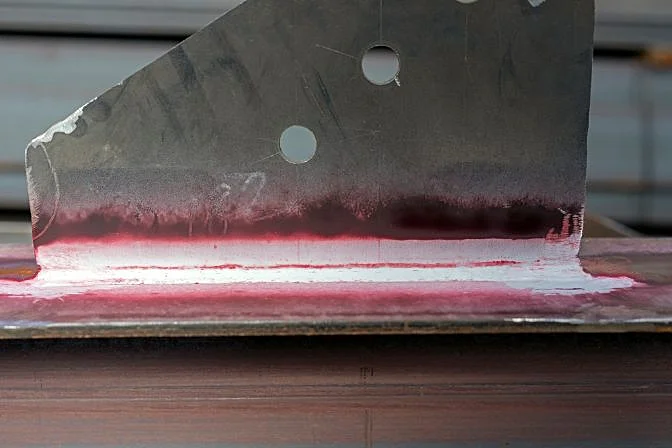
4. Apply Developer
A white developer is applied to the surface, which draws the penetrant from the cracks, making them visible under normal or UV light.
5. Inspection
Inspectors examine the surface for indications of defects. Visible dye penetrants are seen under normal lighting, while fluorescent ones require ultraviolet light for visibility.
6. Clean the Surface
Finally, the surface is cleaned to remove any residual dye or developer, returning it to its original condition.
Choosing Penetrants, Removers, and Developers
Inspectors have various options for each stage of the process, including different types of penetrants, removers, and developers. These choices depend on the material, surface condition, and desired level of sensitivity.
Penetrant Options: Color contrast, fluorescent, or combination (both color and fluorescent)
Remover Options: Solvent-based, post-emulsifiable, water-soluble, or water-suspendable
Developer Options: Dry powder, aqueous, or non-aqueous
Each combination offers unique benefits, allowing inspectors to tailor the process to their specific needs and environments.
Dye Penetrant Standards and Codes
While dye penetrant testing is often used for general inspections, it is also employed in code-compliant scenarios. In such cases, strict adherence to established standards is required, including written procedures and certified personnel.
Some of the most commonly referenced standards include:
ASTM (American Society for Testing and Materials)
- ASTM E 165: Standard Practice for Liquid Penetrant Examination for General Industry
- ASTM E 1417: Standard Practice for Liquid Penetrant Testing
- ASME BPVC, Section V, Article 6: Liquid Penetrant Examination
- ASME BPVC, Section V, Article 24: Standard Test Method for Liquid Penetrant Examination SE-165
ISO (International Organization for Standardization)
- ISO 3452-1: Non-destructive testing - Penetrant testing - Part 1: General principles
- ISO 3452-2: Non-destructive testing - Penetrant testing - Part 2: Testing of penetrant materials
- ISO 3452-3: Non-destructive testing - Penetrant testing - Part 3: Reference test blocks
- ISO 3452-4: Non-destructive testing - Penetrant testing - Part 4: Equipment
- ISO 3452-5: Non-destructive testing - Penetrant testing - Part 5: Penetrant testing at temperatures higher than 50°C
- ISO 3452-6: Non-destructive testing - Penetrant testing - Part 6: Penetrant testing at temperatures lower than 10°C
- ISO 3059: Non-destructive testing - Penetrant testing and magnetic particle testing - Viewing conditions
- ISO 12706: Non-destructive testing - Penetrant testing - Vocabulary
- ISO 23277: Non-destructive testing of welds - Penetrant testing of welds - Acceptance levels
CEN (European Committee for Standardization)
- EN 1371-1: Founding - Liquid penetrant inspection - Part 1: Sand, gravity die and low pressure die castings
- EN 1371-2: Founding - Liquid penetrant inspection - Part 2: Investment castings
- EN 10228-2: Non-destructive testing of steel forgings - Part 2: Penetrant testing
- EN 10246-11: Non-destructive testing of steel tubes - Part 11: Liquid penetrant testing of seamless and welded steel tubes for the detection of surface imperfections
For more information on these standards, visit the official websites of the following organizations:
- American Society of Mechanical Engineers (ASME)
- American Society for Testing and Materials (ASTM)
- The National Board of Boiler and Pressure Vessel Inspectors (NBIC)
- International Organization for Standardization (ISO)
Silicone Leather Silicone leather for outdoor equipment
Silicone leather for public facilities
Silicone leather for upholstery Silicone leather for fashion Silicone leather for automotive Silicone leather for children Silicone leather for sport Silicone leather for healthcare and military Silicone leather for sailing Silicone leather is a new type of environmental protection leather, silicone as the raw material,
this new material and microfiber, non-woven fabric and other substrates combined, processed and prepared, suitable for a variety of industry applications. Silicone leather using solvent-free technology, silicone coating bonded on a variety of substrates to make leather. Belongs to the 21st century development of new material industry. Due to the excellent characteristics of silicone leather itself: flame retardant, weather resistance, anti-fouling, easy to manage, skin friendly is not sensitive, anti-mildew and antibacterial, wear-resistant and durable, safe and non-toxic performance is very outstanding, suitable for hotels, 3C, home, cars, children and other major industries. Compared with traditional leather, silicone leather has advantages in hydrolysis resistance, low VOC, no odor, environmental protection and other properties. In the case of long-term use or placement, PU/PVC and other synthetic leather will make the residual solvent and plasticizer in the leather will be released constantly, which is very bad for people's health. Physical and chemical stability: long-term use no yellowing, no aging, anti-UV; High temperature ultraviolet exposure without odor, no harmful gas production; High and low temperature resistance: low temperature unchanged hard, high temperature is not soft (-50~200℃); Gas permeability, Silicone Material with PU, PVC tens of times of gas permeability; Antibacterial, no mold; Good elasticity, feel comfortable; Excellent biocompatibility.
Silicone Products,Silicone Leather For Marine,Eco-Friendly Leather Traduzione,Eco Friendly Artificial Leather
Changzhou Dahua-Luckypower , https://www.czluckypowertech.com